
ShellSculptor is designed around the premise that seashells and many other hard parts of living creatures grow in spirals. You've probably seen this in seashells, but consider a pinecone, the talons of a hawk, or the horns of a ram or ibex.
It helps to know some things about how shells grow.
It helps to know some things about how shells grow.
 The spot on a shell where it spirals down to a point is called the Apex. It's hidden inside some shells, but for all snails, this is where growth first starts at birth. In ShellSculptor, if you have the grid turned on then the apex will be at the center, where the axis lines cross.
Most seashells naturally spiral around an imaginary line, often called the "axis of coiling". Figuring out where this imaginary coiling axis runs through a real shell is the first step in realistically modeling it. The coiling axis almost always goes through the apex where the shell started, but it can be tricky figuring out where it comes out of the shell. In ShellSculptor, the coiling axis is the vertical grey line in the center when the grid is on.
In a real creature, the hard material is slowly laid down along a growing edge (the aperture) in the shape of a 3D curve. The shape of this curve and where it's located relative to the apex and coiling axis will define the larger shape of the whole organism.
Most snails grow in a repeating way, with their growing edge curves changing over time, but returning to similar shapes. A segment of the shell that repeats again and again is commonly called an "increment". Once an increment is modeled, the entire shell can basically be generated by turning and shrinking that increment, over and over. We take advantage of this to create a shell's shape very quickly. In our case, we model an increment with 3D curves that get blended together as they are rotated and shrunk. Each curve is calculated to smoothly pass through a series of 3D control points. More on the different curves later.
 Navigation and Editing
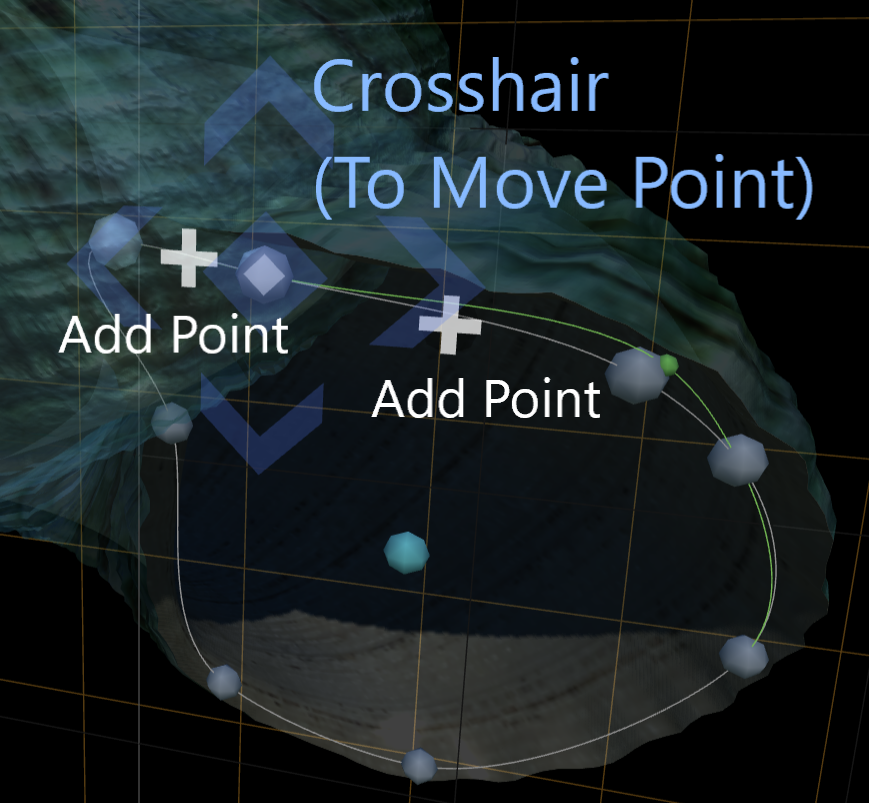
Clicking or tapping a control point (a sphere that sits on a curve) will select it and add a movement crosshair so it can be moved. Drag the crosshair to move the point. Click or tap off of a crosshair to deselect the point.
Dragging anything except a crosshair will rotate the scene around a point in the middle. If you rotate the scene to look at the crosshair from different direction, you can move the point in different directions.
You can use the arrow keys to slide sidways or up and down. Dragging two fingers up or down on a touchpad, pinching on a screen, or scrolling a mouse scroll wheel will zoom in and out.
Clicking or tapping "Reset View" will move the view so the whole shell is shown.
 Whorls
A 360 degree segment of growth around a shell is called a "whorl" by biologists. The biggest and most recently-grown whorl on a shell (where the opening or "aperture" is) is called the "body whorl," and it's where much of a snail's body fits. ShellSculptor builds a shell "backwards", starting with the body whorl and moving toward the apex.
The number of triangles in the 3D model is determined by the number of whorls chosen and the detail level (more on that next). You can expect large numbers of whorls to take a toll on the performance of your system. If it's running slow, try lowering the level of detail or the neumber of whorls. Also, if you don't need the inside whorls to go deep into the shell, set them to 1 whorl.
 Detail Level
In ShellSculptor, the intricacy and accuracy of the shape is driven by the "detail level" parameter. Different numbers of points are "sampled" to create the 3D shape so that the user can adjust the speed of the website on their system. The detail level and the number of whorls control the number of triangles in the 3D model.
Each increasing level of detail has about 4 times as many triangles as the last (2 times as many, in 2 different directions), so you may expect the highest levels of detail to take a toll on the performance of your system. Having a powerful graphics card helps immensely. If the website is running slow, try lowering the detail level and/or the number of whorls. You can always raise them again later (e.g. to 3D print).
If the surface is smooth, you don't need high detail levels to make it look good, since the browser does blending. This picture is in 3D print preview mode, which turns that blending off so you can see individual triangles.
 Example Shell
To explain the different parameters we use to shape shells, we'll start with an example shell (on the left) and modify it in different ways. This one is based on a main curve that is a simple flat circle. You can click or tap the picture to see it rotate, or you can click or tap the link on the name to open the shell and modify it in 3D.
![Example.main[0].x](./thumbs/Example.main%5B0%5D.x-s.gif) The Main (Grey) Curve
The Main (Grey) CurveAlong with the two Spiral Parameters (more about them below), the main curve controls the basic shape of the outside of the shell. You can edit it by moving the grey control points. Editing mode needs to be "Edit Main Curve" to move them individually.

![ExampleRGB.green[0].x](./thumbs/ExampleRGB.green%5B0%5D.x-s.gif) Red, Green, and Blue Curves
Red, Green, and Blue CurvesTo change the outside shape in a repeating way, three different repeating curves can be used. They are color-coded Red, Green, and Blue. To edit each of these curves, change the editing mode, for example selecting "Edit Green Curve" to control points on the green curve.
Red Curve: Controls points near 1/6 of the way through the increment
Green Curve: Controls points near 1/2 of the way through the increment
Blue Curve: Controls points near 5/6 of the way through the increment
![Example.aperture[0].x](./thumbs/Example.aperture%5B0%5D.x-s.gif) Aperture (Purple) Curve
Aperture (Purple) CurveThis curve controls the surface near the opening of the shell. Once they reach maturity, many mollusks begin to grow in a new pattern different from the original spiral. A classic example is the Queen Conch, which grows out sideways once it matures. To model this type of growth we use a separate Aperture Curve (shown in purple).
![Example.inside[0].x](./thumbs/Example.inside%5B0%5D.x-s.gif) Inside (Yellow) Curve
Inside (Yellow) CurveThis curve controls the shape of the inside surface, but only when "Use Inside" is enabled.
 Moving the Center Point
All of the control points on all of the curves can be moved together in unison by clicking or tapping the teal center point in the middle and moving the crosshair on the center point. This will shange the shape of the shell significantly.
 Shape Controls
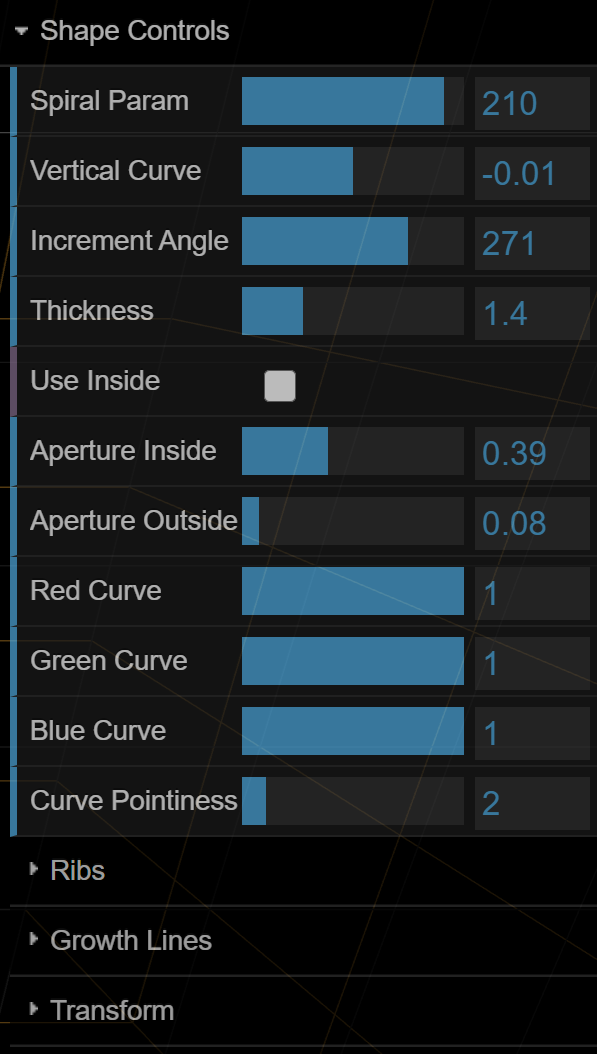
A series of parameters control the shape of a shell in addition to the 3D curves. These are controlled from the collapsible menu on the top right side.
 The Spiral parameter controls how tightly the shell curls, and in which direction, either right-handed (dextral) or left-handed (sinestral).
 The Vertical Curve parameter controls the ratio of vertical and horizontal curl. This affects the shape of the spiral, whether it curves in (in a concave way) or out (in a convex way). Some real shells (like cone shells) have a concave (pointy) curve, while some (like periwinkles) have a convex (rounded) curve.
 Red, Green, and Blue Curve Widths
Each of the Red, Green, and Blue Curves has a width that controls how far around the increment the influence of the curve reaches. The aperture has two widths, one that controls its influence on the outside surface, and one that controls its influence on the inside surface.
 Ribs: Lines and grooves that run in a spiral around the shell (parallel to the direction of growth).
Ribs have parameters for number, height, blockiness and spikiness, and can be repeating or random.
 Growthlines: Lines and grooves that run in a loop around the tube (perpendicular to the direction of growth).
Growthlines have parameters for number, height, blockiness and spikiness, and can be repeating or random.
©2021 ShellSculptor.com. All Rights Reserved.